The DIY project I decided to undertake required channeling my childhood in attempt to build and fly a kite. Initially, I actually wanted to make glow sticks but realized I would have to buy large amounts of chemicals, which could cost me a pretty penny and make me look like Walter White from Breaking Bad. With glow sticks out of the equation, I figured kite making was the next best thing that was still out of my comfort zone. The reason for taking on this “foreign” project is that I am not experienced in building things and/or working with physics (specifically, the wind in this case). In high school, physics was definitely my hardest class, so these days, I usually steer clear of anything that could deal with that subject matter. My first impression or concern when taking on this project was that I thought it would be much harder to build the kite rather than fly it. However, when I started to fly, I soon learned that had my I had the two parts switched.
I tracked down five sources to help me with this project. The first thing I needed to do was remember how to fly a kite or at least investigate the basics of the kite making and flying processes. The National Kite Month website, created by the American Kitefliers Association, was the first source I came across that ended up being very official and helpful. The website outlined different kite types and kite flying do’s and don’ts. To see the new information I was learning in action, I came across a video (see bottom of blog) that shows how to fly a kite, which went over different flying conditions and ways to hold and fly the kite to accommodate those changes. The video was actually made by Gomberg kites, a website I used later on in my project.
Finally, after getting some basic knowledge about kites, I was ready to build! After using pinterest this summer to create some fun projects, I decided to use blogs to find instructions on how to construct my kite. I couldn’t find the Hale-Evans reading, but investigated the three learning styles and learned I fit under the visual category. For instance, I find blogs more atheistically pleasing and condusive to my visual learning style, which is very helpful considering I was building something technical.
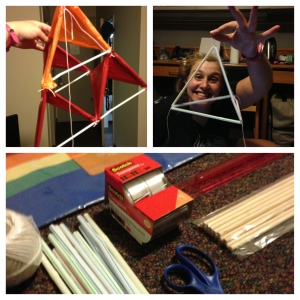
According to my friends, the first kite I decided to build apparently looked like the triforce from Legend of Zelda, whose design came from a decent looking blog called Neverland Nook that is created by two friends that sell their products on Etsy. This blog provided very clear instructions and pictures on how to get me through the building process, so I enjoyed working with it very much and loved my finished product. When heading to gather my supplies, the only issue I encountered was not being able to find straight straws versus bendy straws. Besides that minor technical problem, building was fun and easy, with the finished product looking legit in my opinion. Like I said earlier, flying the kite ended up being harder than building. I enlisted the help of my friends and we tried everything from running the kite at various angles to trying to fly it from the back of my car, which was really funny to watch, as you can hear me laughing in the videos included on my slides.

The triforce in action! Here you can see the building supplies, one of the frames made out of straw, and the finished product.
After not having much success with flying the triforce kite, I decided to go back to basics. I used another blog called made by joel, who’s purpose is to promote crafts that are “accessible and meaningful.” Like the first blog, these were straight forward and visually appealing instructions on how to build a simple diamond kite. To check the credibility of the blog, I did happen to find semi-official looking instructional video (see bottom of blog), to see if the ideas were somewhat similar, which they were. After considering all these factors, I decided first I would build the simple kite from the blog and if I had success, I could build the fancier version later. Anyways, the whole intention of going back to the original was to see if having a different design, with a foundation of construction paper and wooden dowels, would hold up better in the wind. To prepare for my flying session with my simple diamond kite I needed to find out some tips on how to fly a kite with no wind, to help troubleshoot in case we ran into the same problem. The National Kite Month website I mentioned earlier actually was helpful as well as another website by Gomberg kites, that gave me more tips. Having advice from a kite flying business seemed like a trustworthy site since they have professional experience with kites.

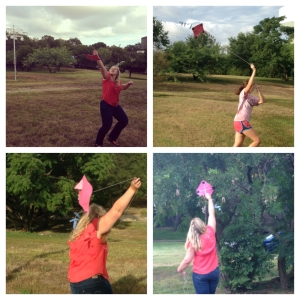
Here are pictures of the simple diamond kite. The top right picture actually looks like it is flying, which is exciting. The other pictures are “fail” pics and the last picture is me trying to put the kite in the tree to help get it off the ground when we started flying it.
The new tips I used when I went out flying included sticking the kite up in a tree to give it a higher starting point and also holding the kite above my head for a friend while she started running. Overall, I learned that San Antonio is not the best place to catch wind to fly a kite, however my design could also be faulty. The leaning experience was interesting and I would definitely say that my favorite part of the process was making the kites. Even though my kites didn’t successfully get way up in the air, it was fun to run around with my friends and have a good laugh while trying to fly them.
* Note: The videos I used were being problematic when creating a hyperlink with a word or even just putting in the web address. I didn’t want to take away from the blog flow, so the videos are down here.
Video 1
Video 2


